Introduction
Proper sealing of dewatering wells is critical to ensure structural integrity and waterproofing in construction projects. This guide outlines the step-by-step process for effective dewatering well sealing, following the “inside-out” principle for optimal results.
Key Principles of Dewatering Well Sealing
- “Inside-Out” Approach: Seal wells starting from the center before moving to peripheral ones.
- Pre-Sealing Water Level Control: Maximize dewatering around the target well to minimize internal water pressure before sealing.
- Final Well Caution: Exercise extra care when sealing the last remaining wells.
Step-by-Step Sealing Process
1. Dewatering System Design
- Analyze engineering drawings and geological conditions to design an efficient dewatering system.
- For localized deep areas (e.g., elevator pits, sumps), place wells centrally or nearby for maximum efficiency.
- Position wells in areas with thinner waterproof slabs to simplify sealing and reduce costs.
- Avoid interference with structural elements (piles, columns, shear walls, foundation beams).
2. Dewatering Well Construction
- Install wells and initiate dewatering operations.
3. Excavation Precautions
- Protect well openings with composite bamboo plywood to prevent soil ingress.
- Reserve 300mm of soil around wells for manual excavation to avoid mechanical damage.
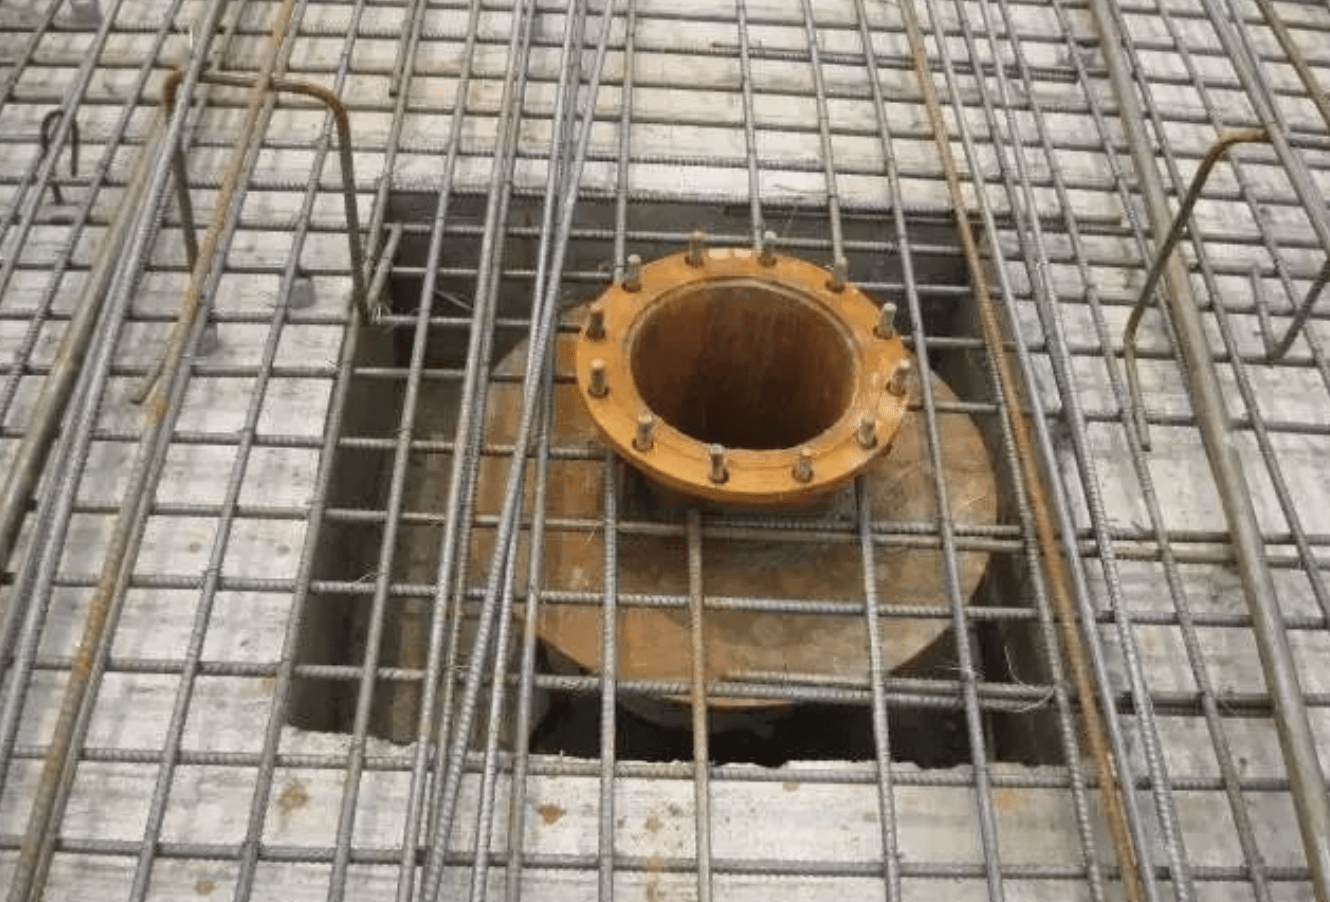
4. Waterproof Steel Sleeve Fabrication
- Use Φ325×8 hot-rolled seamless steel pipes (height ≥ combined slab & footing thickness).
- Fabricate waterproofing external rings (≥6mm steel, OD ≥525mm) and weld at sleeve mid-height.
- Weld internal flange bolts and base reinforcement (4xФ20x150mm rebars).
5. Sleeve Installation
- Fix the sleeve centrally over the well before footing concrete placement.
6. Waterproofing Membrane Application
- Extend the membrane up to the sleeve’s external ring, sealed with waterproof mastic.
7. Slab Construction
- Install additional rebar around sleeves per design specifications.
8. Well, Backfilling
- Phase dewatering shutdown:
- Stop interior dewatering first.
- Seal interior wells.
- Stop exterior dewatering.
- Backfill with graded gravel (base) and dry Portland cement (upper 2m).
9. Flange Sealing
- Install 10mm rubber gaskets and tighten bolts crosswise for airtight compression.
10. Concrete Placement
- Fill sleeve with high-grade dry concrete (one class above slab mix) and compact thoroughly.
11. Curing Protocol
- Secondary compaction before the initial set.
- Cure with plastic sheeting and felt (≥14 days) to minimize shrinkage.
Conclusion
Adhering to this methodical sealing process ensures long-term waterproofing performance and structural stability. Always align sequencing and timing with real-time site monitoring and design requirements.