Bored Bite Pile Construction Method
Bored interlocking piles are drilled into piles by rotary drilling. The piles are arranged to interlock with each other. The pile diameter is 120cm and the mutual interlocking length is 20cm. Sequence I piles are made of ultra-retarding concrete (more than 80h). There are two types of interlocking piles, square steel cage piles I sequence piles and round steel cage piles II sequence piles. Construction sequence: Construction of sequence I piles first, and then construction of sequence II piles. Part of the concrete of sequence I pile must be cut to form an interlocking structure. For the construction of sequence I pile, as long as the single pile construction process is strictly followed and the vertical accuracy is ensured, the requirements can be met; for the construction of sequence II piles, in addition to ensuring vertical accuracy, it also involves the extrusion and friction of cutting during the construction process. The damage has become a pile of damage. Therefore, a retardant is added to the concrete so that the second sequence pile can be constructed when the concrete of the first sequence pile is not in the initial setting state, thereby eliminating the harm to the first sequence pile.
1. Construction technology of drilled bite piles
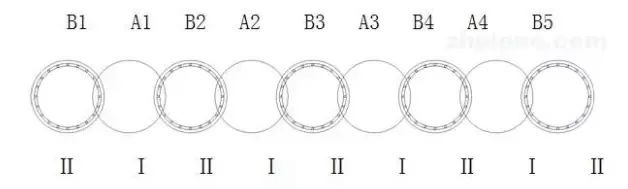
The general principle of boring bite pile construction is to construct the cut I pile first, followed by the II pile, and the construction sequence is A1-A3-A2-A4-B1-B2-B3-B4. (The following figure)
2. Place the pile driver in place and form the hole
The pile driver is aligned along the guide plate to align the stakes designated by the bite piles, the casing and related equipment are transported to the lifting range of the crane, and all construction personnel are in place.
After the drilling rig is in position and aligned, the first section of the casing can be installed only after checking that it is correct. Start the machine to press the first section of the casing into the soil (as deep as possible). During the pressing process, observe the casing with a theodolite in mutually perpendicular directions. Pipe verticality. If it is found that the verticality exceeds the standard during the sinking process of the casing, the cause should be found and corrected. During the immersed pipe process, if the verticality is normal, you can start collecting soil and continue immersing the pipe until the first section of casing sinks to the height of the pipe (1m above the ground), which is planned to take 30 minutes. When the first section of the casing is exposed about 1.5m, the second section of the casing can be hoisted. After the installation of the casing is completed, check the verticality and check whether the casing screws are tightened. This work should be completed within 20 minutes. After completing the docking of the second section of the casing and verifying the verticality, the rotary drilling rig can be used to retrieve soil from the casing. The soil extraction in the casing must be accurate and stable to avoid the soil extraction drill bit hitting the casing and unnecessary deflection. Follow this procedure to complete the installation of other sections of casing. When the soil is taken to the designed hole bottom elevation, the soil can be grabbed by punching to enhance the soil taking effect and speed up the speed.
3. Hole cleaning and measurement
After the hole formation is completed, the soil attached to the edge of the pile top sleeve should be cleaned in time to ensure the placement quality of the steel cage and avoid pulling out the sleeve to bring out the steel cage.
After the hole cleaning is completed, use a measuring rope to measure the depth and verticality of the hole. If the self-test is correct, report it to the relevant department for re-inspection and supervisory inspection. At the same time, make preparations for hoisting the upper and lower sections of the steel cage.
4. Hang the steel cage
Before hoisting the steel cage, the steel cage should be inspected. The inspection content includes length, diameter, welding points, whether it is deformed, etc. After the inspection is completed, the hoisting can begin. The hoisting is carried out slowly at 4 points with double hooks of a car crane to prevent deformation of the steel cage. During the process of lowering the cage, it should be lowered gradually. The steel cage is hoisted in two sections and mechanically connected in the middle. During the hoisting of the steel cage, cut the steel cage according to the pre-measured paint position, and divide the steel cage into two sections for lifting. After cutting the steel cage, the cutting opening of the steel bar should be modified to ensure that the extrusion sleeve can be inserted into the steel cage. At both ends of the steel bar cutout, use red paint to mark the length of the connection into the extrusion sleeve. The steel cage should be hoisted straight and stable, aligned with the hole position and slowly lowered, and should not be shaken to collide with the hole wall or force the manhole. During the segmental lifting process, after the lower steel cage is hoisted into the manhole, its upper end should be left about 1.5m and temporarily fixed at the opening. After the main bars of the upper and lower steel cages are aligned and connected, and the supervision acceptance meets the requirements, they can continue to be decentralized.
Truss bars are provided on both sides of the square steel cage to ensure that the steel cage does not bend or twist during the hoisting process. When hoisting and installing the square steel cage, it should be noted that the steel cage is divided into the inside and outside of the pit, and the direction must not be reversed to ensure that the stress requirements meet the design intent.
5. Underwater concrete pouring
The concrete conduit adopts a steel conduit, and each section of the conduit should be tightened to prevent air leakage from blocking the pipe. The bottom of the concrete conduit is about 30 to 50cm away from the bottom of the hole.
After the concrete conduit is installed, the pipe extraction inspection should be carried out. The purpose of the inspection is to check whether the casing is pulled out smoothly and whether the steel cage follows the pipe or rotates during the pulling-out process. The lifting amount is generally controlled at 10 to 20cm.
Preparations before pouring include moistening the loading hopper and storage hopper with water, conducting on-site concrete slump tests, and making concrete test blocks. If it is found that the workability of the concrete has deteriorated and the slump does not meet the design requirements, it is strictly prohibited to directly inject water into the concrete. Tank truck. After checking that everything is normal, load the material for the first time. After the concrete is poured to a certain height, the sleeves and concrete conduits can be removed in stages. During the removal of the bite pile casing, the same length of concrete conduit can be removed simultaneously. The above-mentioned concrete pouring and pipe-pulling plan should be determined through on-site operation tests to prevent the outer casing from being buried too deep and making it difficult to pull out the casing.
6. Construction precautions
Since the thickness of the occlusal surface of the pile is only 20cm, if the vertical accuracy of the hole formation is not well controlled, front and rear, left and right splits will occur. To control the hole-forming accuracy of drilled bite piles, it is necessary to take measures to control the hole-forming accuracy throughout the process.
1. The vertical accuracy should reach 3‰, and the thickness of the most unfavorable occlusal surface of the post-occlusal embedded pile is still 10.7cm.
2. Use a positioning guide plate to accurately place the first section of casing and accurately control the hole forming accuracy.
3. Full process control of the vertical accuracy of hole formation: hoist the first section of casing, use a guide plate to position and press down, use a fixed bracket to support the lifting wire hammer to control the verticality of the outer wall of the casing in the north-south and east-west directions, and use two inclinometers attached Stick it on the outer wall of the casing in two vertical directions for verification. This kind of control is integrated into the whole process control of casing depression, that is, the deflection is corrected while pressing down, and the stroke of the depression cylinder is 25cm each time.
4. Monitoring and inspection of vertical accuracy during the hole-forming process:
① For ground monitoring, select two mutually perpendicular directions on the ground to use a theodolite or a line hammer to monitor the verticality of the casing above the ground, and correct deviations promptly if any deviation is found. This monitoring should be maintained throughout the drilling process of each pile.
② Inspection in the hole. After each section of casing is pressed and before installing the next section of casing, stop and use an inclinometer to check the verticality in the hole. If it is unqualified, it must be corrected. The next section of the casing cannot be carried out until it is qualified. Pipe construction.
5. Correction method during the hole-forming process: If any deviation in verticality is found during the hole-forming process, corrective adjustments must be made in time. Commonly used correction methods include:
① Use the hydraulic cylinder of the drilling rig to correct the deviation. If the deviation is not large or the casing is not deep in the soil (5m
Within), the two lifting cylinders and two horizontal cylinders of the drilling rig can be directly used to adjust the verticality of the casing to achieve the purpose of correcting the deviation.
② When the depth of the casing in the soil is greater than 5m, the I-sequence pile will shift. At this time, it is difficult to correct the deviation of the oil cylinder. Sand can be filled into the casing (the hole-forming part). While filling the sand, pull up the casing and correct the deviation at the same time. After reaching the accuracy Then press down the casing to take out soil and form a hole.
③ When the depth of the casing into the soil is greater than 5m, the II sequence pile will deflect. At this time, the same grade of concrete as that of the I sequence pile should be poured into the casing, and the correction method is the same as the I sequence pile.
Thanks
Bored cast-in-place piles have the advantages of low construction noise, and low vibration, pile length…
Bored cast-in-place piles have the advantages of low construction noise, and low vibration,…
The four major construction technologies are dry hole forming technology, slurry static pressure technology, casing…
Soil nail support is a new type of retaining structure developed in recent years for…
Pile Foundation Classification and Construction Principles 1. Classification According to Load-Bearing Piles ① Friction type…
Steel sheet pile cofferdams are suitable for basic projects such as sandy soil, gravel soil,…