(Steel cage production)
Before Talking About the Construction of Punched Piles, Let’s Talk About the Hole Forming of the Mud Wall Protection Wall.
1. Functions of mud:
①Prevent hole wall collapse
⑴ The static side pressure of the mud can resist the earth pressure and water pressure acting on the hole wall and prevent groundwater from infiltrating. ⑵ The mud forms an impermeable mud skin on the hole wall so that the static pressure of the mud effectively acts on the hole wall and prevents the hole wall from peeling off. ⑶ The mud penetrates from the surface of the hole wall into the formation to a certain extent and adheres to the soil particles. This adhesion can reduce the collapse and water permeability of the hole wall.
② Mud has the function of suspending and discharging soil debris and rock fragments
A reasonable mud density can discharge the soil residue and broken rock suspended in the mud to the mud pool for sedimentation through mud circulation. (The mud is forced to the bottom of the hole through the pipe, and the slurry rises outside the pipe, carrying the soil out of the ground. This is a positive circulation method.)
2. Preparation of mud
Mud should be prepared except for sticky soil layers that can make mud on their own. (Highly plastic clay or bentonite)
During the hole-cleaning process, the mud should be continuously replaced until underwater concrete is poured.
3. Mud test
Density, sand content, and viscosity <For details of the test method, please see page 679 of the construction manual>
(Before pouring concrete, the relative density, sand content, and viscosity of the mud should be measured. The specific gravity of the mud within 500mm of the bottom of the hole should be less than 1.25, the sand content should not be greater than 8%, and the viscosity should not be greater than 28s.)
⊙Scope of application
1. The construction period is unpredictable
2. Applicable to a wide range of soil layers, use with caution in areas with karst development.
╋Principle
The winch suspension design requires the aperture (blade foot diameter) ram to reciprocate up and down to break the hard soil or rock into holes. Some of the debris and mud will be squeezed into the hole wall, and most of it will become sludge, which will be discharged with the mud circulation and then filled with water. Put concrete into piles.
╋Preliminary preparation
1. Pile number
2. Construction plan
3. Power supply plan (considering power load)
4. Overall progress plan
5. Security technology briefing
╋Construction machinery and equipment
Welding machine, distribution box, switch box, mud pump, punching pile driver, frame, impact hammer (the salvage device must be welded on the hammer, and the rock sample sampling groove can be welded to facilitate rock sample recording)
╋Construction process
Mud preparation (self-made slurry or bentonite shipped from outside, combined with on-site considerations)
↓
Excavation of slurry ponds and trenches
↓
Paving bricks and slag, leveling the site
↓
Pile position laying out (number the piles in the early stage, and reasonably plan and arrange the position of the pile driver based on the site conditions. Consider factors: maintaining the original soil of the site + whether the pump truck can pass.)
↓
The casing is buried (usually an excavator is used, but the disadvantage is that the casing will collapse during the rainy season)
↓
Pile driver in place
↓
Punching (mud circulation)
↓
First hole cleaning (removing mud)
↓
Lower the steel cage
↓
Downtube cleaning for the second time
↓
Pouring underwater concrete → forming piles
╋Hammer control
The stroke of the soil layer is about 2m, and the rock layer is about 1m.
When opening the hole, strike closely with a low hammer
When the topsoil is soft soil such as silt or fine sand, clay blocks can be added with small pieces of stone to repeatedly impact the wall to build the wall.
╋Make hole
① When the soil layer is not good, increase the mud proportion.
② If it is found that the hole formation is offset or inclined rock, the chip should be backfilled to 300-500mm above the offset hole, and then the hole should be punched again.
③ When encountering a boulder, the high and low strokes can be used to impact alternately to crush the boulder or squeeze it into the hole wall.
The mud surface in the hole should always remain stable.
╋Final hole
Measuring rope to measure hole depth (final hole acceptance in the geological survey, construction, and supervision)
In-rock sampling and retention, final hole sampling and retention
(Sealed bag, record absolute elevation, rock sample, hole number, date)
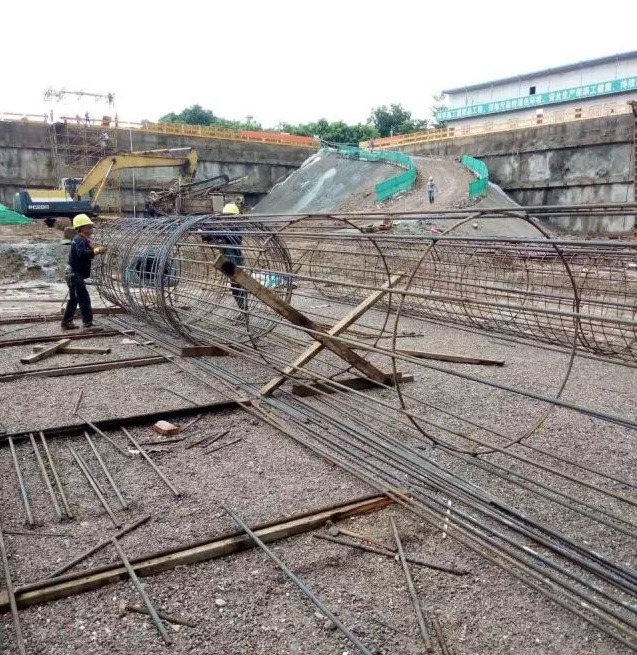
╋Steel cage production
1. The steel cage processing should be carried out on-site as much as possible. The site should be leveled, a simple processing shed should be set up (rain-proof), and the steel bars should be brought into the site → steel bar inspection (raw materials and joint process should be submitted for inspection and on-site joints should be submitted for inspection <300 pieces per group>) → Processing and forming → concealed acceptance → installation and fixing (welding hanging bars on the anchor head of the steel cage to ensure verticality and thickness of the protective layer)
2. The number of joints of main bars in the same section shall not exceed 50%, the joint spacing shall be greater than the anchorage length (11G101-1 page 53), the overlap length of main bars and stiffening hoops shall be greater than 10D for single-sided welding, and greater than 5D for double-sided welding (to avoid welding defects) Full, appropriately lengthened by 1cm)
3. The stiffening hoops are bent round as required, and the stirrups are straightened and then wrapped in circles for later use.
╋Hoisting
1. When there are two sections, overlap them at the opening to ensure that the steel cage is vertical.
2. It is strictly forbidden to use your weight to lower the cage forcibly. The lowering of the cage should be smooth and unimpeded.
3. The steel cage must be accurately positioned and firmly fixed. Concrete can be poured only after verification.
4. Downpipe, secondary cleaning <conduit specifications are 0.5m, 1m, 1.5m, 2.53m, bottom 4m>, the second cleaning time should be no less than 30 minutes; pour concrete immediately after cleaning, wait for the concrete truck to arrive Remove the catheter again.
╋Quality control measures for poured concrete
1. The sediment at the bottom of the second hole cleaning shall not be larger than 50mm, and the supervisor will report the material after confirming the hole cleaning.
2. When starting to pour concrete, the distance from the bottom of the conduit to the bottom of the hole should be 300 to 500mm.
3. The initial pouring amount of concrete should ensure that all the water in the conduit is pressed out, and the conduit can be buried 1 to 1.5m deep in the concrete for the first time; the depth of the conduit buried in the concrete should be 2 to 6 meters, and it is strictly prohibited to lift the conduit out of the concrete pouring surface. .
4. The pouring of underwater concrete must be carried out continuously. The pouring time of each pile should be controlled according to the initial setting time of the first load of concrete. Failures during the pouring process should be recorded and filed.
5. The last pouring amount should be controlled, and the overfilling height should be 0.8 to 1m. After removing the floating slurry height, it must be ensured that the strength level of the exposed pile-top concrete reaches the design requirements.
6. Test block retention: Each pile is in a group of 50m³ and maintained as standard.
7. Clean the pipe after watering.
8. Compile inspection batch information and submit it to supervision and archiving.
Analysis of Common Situations in Punching Pile Construction:
#Collapsehole#
It often occurs during the hole-forming process in interlayers such as thick sand, pebble, and silt layers in the stratigraphic structure. Due to the poor integrity of the sand layer, pebble layer, and silt layer, if the construction reaches the interlayer, low-quality mud or mud used in general geological conditions will not be able to protect the wall, and the hole wall of the interlayer will be unstable, resulting in collapse. hole.
In addition, in limestone areas, the phenomenon of stepping on holes is also prone to occur. Due to the development of cracks and good connectivity in underground caves in limestone areas, when pile holes encounter underground caves, karst tanks, or underground rivers, the mud level in the pile holes will be reduced due to mud leakage. Dropping suddenly, the hole wall suddenly loses the effect of mud static pressure and collapses into the pile hole.
When encountering a collapsed hole, the common treatment method is to immediately lift the pile hammer, throw small stones and clay blocks into the pile 1 to 2 meters above the collapsed hole, and wait for them to settle before repeatedly impacting the wall again.
#Rebar Cage Cannot Be Lowered or Floated#
The rock slag sticks to the hole wall to form a large hard structure, and the steel cage gets stuck in the hole when it is lowered.
Treatment method: Rotate first. If it still cannot be lowered, lift out the steel cage and scan the holes again.
The floating steel cage often occurs in the second half of the pouring of underwater concrete. The main reasons are:
1. When the bottom end of the conduit is close to the bottom end of the steel cage, the concrete is poured too fast. When the concrete flows out, the impact force is greater, pushing the steel cage to float upward.
2. When pouring concrete, the pipe was buried too deep, the concrete pouring time was too long, and the surface concrete was almost finally set, resulting in a certain holding force between the concrete and the steel bars.
3. Hook the steel cage when lifting the pipe.
Measures to Prevent and Deal with Floating Steel Cages:
1. After pouring the first truck of concrete, slow down the pouring speed appropriately and control the buried depth of the conduit to reduce the upward force of the concrete.
2. Try to shorten the overall pouring time of concrete. If the overall pouring time is long, measures should be taken to extend the initial setting time of concrete.
If it is found that the steel cage is floating or has floated, stop the perfusion immediately, remove a section of the catheter, and then “increase the catheter slowly and lower it quickly” to solve the problem.
#Pile Hole Offset Hole#
The main reasons causing side holes:
1. The eccentricity of the pile hammer is too large or the teeth are missing.
2. Encounter a probe stone during the rush.
3. The geological rock formations at the construction site have a very steep slope, or the soil quality at the bottom of the hole is uneven and the rock strength is different.
4. The flatness and density of the site are poor, the installation of punched piles is uneven, or uneven settlement occurs during the punching process, resulting in the deviation of the punched piles.
5. When rushing into the interface between soft and hard soil or on an inclined rock surface, the rock layer will be unevenly stressed when squeezing the rock layer, resulting in eccentric holes.
After the deviation occurs, if the deviation is serious, you can backfill the pile hole with rocks and clay blocks, then use a low hammer to hit it closely and make repeated corrections to achieve the desired effect.
Preventive measures: Do not use a hammer with excessive eccentricity; check the pile hammer regularly and replace it promptly if the hammer teeth are found to be severely worn (there should be a dedicated welder dedicated to changing the teeth of the hammer); pay attention to mud circulation, and the mud ratio is important; under the pile frame It must be stable to prevent the pile frame from moving or tilting during the construction process.
Attachment: (Pile foundation inspection)
Ultrasonic (acoustic detection tube must be installed if the pile diameter is greater than 1.6m to detect the integrity of the pile body)
Low strain (applicable to pile diameter less than or equal to 1.6m, detecting pile integrity)
Core-pulling test (after the pile integrity report is released, if there is any doubt about the quality of the pile, a core-pulling test can be performed, and the number shall not be less than 15% of the total number of piles)
Thank You!
Bored cast-in-place piles have the advantages of low construction noise, and low vibration, pile length…
Bored cast-in-place piles have the advantages of low construction noise, and low vibration,…
The four major construction technologies are dry hole forming technology, slurry static pressure technology, casing…
Soil nail support is a new type of retaining structure developed in recent years for…
Pile Foundation Classification and Construction Principles 1. Classification According to Load-Bearing Piles ① Friction type…
Steel sheet pile cofferdams are suitable for basic projects such as sandy soil, gravel soil,…