
Due to the complex construction technology of bored pile engineering, various visible or invisible factors may interfere with the final pile quality during construction. To ensure that the quality of the overall pile foundation project meets the design requirements, the prevention and treatment of common quality problems of bored piles are crucial.
Construction Process
Construction preparation → Leveling the site (building an island) → Measurement and positioning → Putting the drilling rig in place → Burying the casing → Drilling → Cleaning the hole → Hoisting the steel cage → Installing the conduit → Secondary hole cleaning → Pouring underwater concrete → Pulling out the casing → Cutting Non-destructive testing of piles
Construction Preparation
The drilling site should make the following preparations based on the terrain, geology, hydrological data, pile top elevation, etc., and the requirements of construction technology:
Site leveling and island building:
If the drilling site is on dry land and the groundwater level is greater than 1m below the original ground during construction, the site should be leveled, debris removed, soft soil replaced, and compacted and filled. The drill base should not be placed directly on unstable fill soil to avoid uneven settlement. Build access roads on dry land to facilitate the transportation of construction machinery, tools, and materials.
When the drilling site is on a steep slope, it should be dug into a flat slope. If there are difficulties, you can use racks or sleepers to build a working platform.
When the drilling site is in shallow water, the island-building method should be used. The top surface of the island is usually 0.75~1.0m higher than the construction water level. The island building area is determined by the drilling method, equipment size, etc.
Bored pile positioning measurement:
First, determine the position of the bored piles: according to the control network and the design coordinates of the bridge pier, use a total station to accurately release the pile positions. Use long wooden piles (with iron nails fixed on them) to accurately mark the center of each pile position. After the positioning is accurate, bury the protective tube and set up guard piles around it. Principles for burying protective piles: Do not affect drilling machinery, hoisting steel cages, and concrete pouring construction; if any loose or abnormal protective piles are found, let surveyors check-in time. The guard piles are about 50 centimeters higher than the original site and fixed with concrete so that the pile center and elevation can be detected at any time and the steel cage can be installed and positioned.
Buried casing:
Install a strong, watertight orifice guard before drilling. Steel casings are generally made of steel plates with a thickness of not less than 8mm in ordinary operating situations and under conditions of small and medium apertures; in conditions such as deep water, complex geology, and large apertures, steel plates with a thickness of not less than 12mm should be rolled. To increase rigidity, use Steel plates not less than 10mm, with stiffening ribs welded to the upper and lower ends of the casing and the outside of the joint. The inner diameter of the casing is about 20cm larger than the diameter of the drill bit. The top surface of the casing is 2m higher than the construction water level or underground water level. It also needs to meet the height requirements of the mud surface in the hole. It must also be used on dry land or when building an island.
0.5m higher than the construction ground. The burial depth of the casing meets the following requirements:
On the beach, the clay soil should not be less than 1m, and the sandy soil should not be less than 2m. When the surface soil is soft, bury the casing at least 0.5m into the harder and denser soil layer. Bury the casing on the beach, backfill the clay around the casing, and compact it in layers; the deviation between the center of the top surface of the casing and the designed pile position shall not be greater than 5cm, and the inclination shall not be greater than 1%.
Use hammering, pressurization, vibration, and other methods to sink the casing in the water. The casing is buried 1m below the river bed surface; the burial depth on the underwater platform is determined based on factors such as the highest construction water level, flow rate, erosion, and geological conditions, and the impermeable layer is driven into the impermeable layer if necessary.
The casing is sunk on the underwater platform, and the position of the casing is controlled by the guiding device.
Construction Technology
Mud preparation:
When drilling in sandy soil, crushed (pebble) soil, or clay interlayer, use bentonite mud to protect the wall. When drilling holes in clayey soil, when the plasticity index is greater than 15, the original soil in the hole can be used to make a slurry to protect the wall.
During drilling construction, as the hole depth increases, grout should be added to the hole in a timely and continuous manner to maintain the proper water head in the casing and prevent the hole wall from collapsing.
When the pile hole is poured with concrete, the overflowing mud in the hole is directed to the mud pool and used in the next foundation pile drilling wall protection.
The specific gravity of the mud entering the hole is 1.1 to 1.3. The specific gravity of the mud at the bottom of the hole should not be greater than 1.3 for sand and clay, the large boulder and pebble layer should not be greater than 1.4, and the rock layer should not be greater than 1.2.
Viscosity: 16-22s for general formations, 19-28s for loose and slump-prone formations.
Sand content: new mud should not be greater than 4%.
Colloidal rate: not less than 95%.
PH value: greater than 6.5. All performance indicators should be tested after slurry making. The mud-specific gravity and sand content should be checked at any time during the drilling process, and the mud test record form should be filled in.
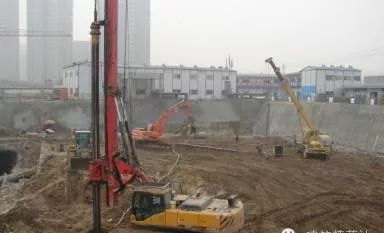
Drilling rig positioning and drilling:
① Before the drilling rig is in place, all preparations for drilling should be inspected. The base and top of the drilling rig should be stable after installation and should not shift or sink during drilling. After the installation is completed, the construction team conducts a self-inspection of the drilling rig.
② Before drilling, draw a geological profile based on the geological and hydrological data provided by the construction design and hang it on the drill floor. Different drill bits, drilling pressures, drilling speeds, and appropriate mud proportions are selected for different geological layers.
③ Drilling operations should be carried out continuously in different shifts. Drilling construction records should be filled in. When handing over the shift, the drilling situation and matters needing attention for the next shift should be explained. Drilling mud and drilling rig alignment should be tested frequently. If they do not meet the requirements, they should be corrected in time. You should always pay attention to stratigraphic changes, and sample slag should be collected and preserved at locations where stratigraphic changes occur.
④ Drilling operations should be carried out continuously without interruption.
⑤ When the drilling depth reaches the design requirements, check the hole depth, hole diameter, hole position, and inclination. After confirming that the design requirements are met, immediately fill in the final hole inspection certificate and obtain approval from the resident supervision engineer before the hole bottom inspection can be carried out. Preparation for cleaning and pouring underwater concrete.
Rotary drilling rig drilling:
Drilling rig in position: The rotary drilling rig uses the traveling system to position itself. After the drill bit and the drill pipe center are aligned with the center of the pile, the drilling rig is then leveled to make the drill frame vertical. The leveling and positioning of the drilling rig are completed using a microcomputer automatic control system.
Inject mud: After the drilling rig is accurately positioned, use a mud pump to inject mud into the casing until the mud does not overflow when the drilling rig rotates. During the rotary excavation process, mud is injected into the hole every time a bucket is dug, so that a certain water head and mud quality are always maintained in the hole.
Rotary drilling: When drilling in general soil strata or soft rock strata, use appropriate drill bits according to the geological conditions. When starting rotary excavation, the speed should be slow to prevent disturbing the casing. During the rotary excavation process of the 5-8m hole section, special attention should be paid to monitoring the verticality through the control panel, and if there is any deviation, correct it in time. During the drilling process, slag samples were taken every 2m, and at stratigraphic changes, the drilling record form was filled in and checked with the geological column chart, and the mud index and rotary drilling speed were adjusted according to different strata. A certain water head should always be maintained in the hole, and mud should be replenished in the hole promptly every time a bucket is dug. During the drilling operation, changes in the ground where the main engine is located and where the outriggers (or tracks) are supported should be observed at any time. If sinking is found, the machine should be stopped in time.
Slag transportation: The drilling slag excavated during the drilling process is temporarily piled near the pile position, and is promptly transported to the designated location by dump truck and disposed of by relevant regulations to reduce environmental pollution.
Impact drill drilling:
Impact drilling is used when there are hard rocks, boulders, and pebbles with large particle sizes in the stratum at the pile location. When opening the hole, first pour mud or water directly into the hole, add clay, and use an impact cone to repeatedly impact with a small stroke to make a slurry. During hole opening and the entire drilling process, always keep the water level in the hole 1.5-2.0m higher than the groundwater, prevent overflow, and replenish water in time after removing the dirt. The 2 to 4m area below the bottom of the casing is generally relatively loose. Use thick mud (or put in clay and small stones at a ratio of 1:1), small strokes, and high frequency to repeatedly smash the casing to form a “hard shell” at the bottom of the casing. Avoid slurry leakage at the bottom of the casing. When percussion drilling, if you encounter an inclined rock surface, backfill it with clay and small pieces of stone and punch it with a small stroke. During the punching process, you squeeze the stone to build a wall while cutting the inclined rock surface until the entire section enters the rock and then drill normally.
 Prevention and Treatment of Common Accidents of Bored Piles
Collapse hole:
Hole collapse accidents may occur in various drilling methods. Hole collapse is characterized by a sudden drop in water level in the hole, fine blisters appearing at the hole mouth, a significant increase in slag output without any footage, and a significant increase in drilling rig load.
Cause of the accident:
① The relative density of the mud is insufficient and other mud performance indicators do not meet the requirements, resulting in no solid mud skin forming on the hole wall.
② The water head in the hole is not high enough due to failure to replenish the mud (or water) in time after the slag is discharged, the river water or tide rising, or the presence of pressurized water in the hole, or the drilling through a strong water-permeable layer such as gravel, loss of water in the hole, etc.
③ The casing is buried too shallowly, and the lower hole leaks and collapses, or the ground near the hole is soaked and softened by water, or the drilling rig directly contacts the casing, causing the hole to collapse due to vibration and expand into a larger collapse hole.
④ Drilling footage too fast in soft sand.
⑤ When the drill cone is raised for drilling, the rotation speed is too fast and the idling time is too long.
⑥ After hole cleaning, the relative density, viscosity, and other indicators of the mud are reduced. After the hole-cleaning mud is sucked away by an air mud suction machine, grout (or water) is not replenished in time, causing the water level in the hole to be lower than the groundwater level.
⑦ Improper hole cleaning operation, the water supply nozzle directly washes the hole wall, the hole cleaning time is too long, or the hole cleaning pause time is too long.
⑧ Collision with the hole wall when hoisting into the steel frame.
Prevention and treatment:
① When drilling in loose silt soil or quicksand, the footage speed should be controlled and mud with larger relative density, viscosity, and colloid rate or high-quality mud should be selected.
② When the hole collapse occurs, the casing can be removed immediately and the drilled hole can be backfilled, and the casing can be re-buried before drilling.
③ If collapse occurs in the hole, determine the location of the collapse and backfill the mixture of sand and clay soil (or gravel and loess) to 1m-2m above the collapsed hole. If the collapsed hole is serious, all the collapse should be backfilled until the backfill is densely deposited. Get in.
④ When cleaning the hole, a special person should be designated to add grout (or water) to ensure the necessary water head height in the hole. It is best not to insert the water supply pipe directly into the borehole. The water should be slowed down through a sink or pool and then flow into the borehole to avoid scouring the hole wall.
⑤ When hoisting into the steel frame, insert it vertically into the center of the hole to avoid touching the hole wall.
Drilling deflection:
Drilling deflection accidents may occur with various drilling methods.
Cause of the accident:
① Encounter large boulders or probe stones during drilling.
② When drilling at the junction of inclined soft and hard strata, the rock surface is inclined; or when drilling into sand and pebble layers with widely different particle sizes, the drill bit will be stressed unevenly.
③ Where the hole is enlarged, the drill bit swings to one side.
④ The drilling rig base is not placed levelly or uneven subsidence or displacement occurs.
⑤ The drill pipe is bent and the joint is incorrect.
Prevention and treatment:
① When installing the drilling rig, make sure the turntable and base are level, and the lifting pulley rim, the hole for fixing the drill pipe, and the center of the casing should be in a vertical line, and check and correct them frequently.
② Since the active drill pipe is long, the upper part swings too much when rotating. It is necessary to add a guide frame to the drill frame and control the lifting faucet on the rod to drill centered along the guide frame.
③ The drill pipe joints should be inspected one by one and adjusted in time. When the active drill pipe is bent, use a jack to straighten it in time.
Dropped objects:
Accidents caused by falling objects may occur during drilling.
Cause of the accident:
① The reason for falling objects is that when the drill gets stuck, the drill pipe or wire rope is overloaded or broken due to fatigue due to strong lifting and twisting and improper operation.
② The drill pipe joint is defective or slippery.
③ The motor wiring is wrong, the drilling rig rotates in the opposite direction, and the drill pipe becomes loose.
④ The welding parts such as the steering ring and steering sleeve are disconnected.
⑤ Wrenches, crowbars, etc. may be dropped due to careless operation.
Precaution:
① Before drilling, the fallen objects in the hole should be removed. Sporadic iron parts can be picked up by electromagnets. Larger fallen objects and drilling tools can also be salvaged with a grab cone, and then the mouth of the casing should be capped.
② Check drilling tools, drill pipes, wire ropes and coupling devices frequently.
Approach:
After the drill is dropped, the situation should be investigated promptly. If the drill cone is buried by sediment or collapsed hole soil and rocks, the hole should be cleaned first so that the salvage tool can contact the drill pipe and drill cone.
Paste drill and buried drill:
Paste drilling and buried drilling often occur in forward and reverse circulation rotary drilling. The characteristic of paste drilling is that the footage is slow when drilling in fine-grained soil layers, or even the pump is blocked when drilling in fine-grained soil layers. Prevention and treatment methods: For forward and reverse circulation rotary drills, mud bags can be removed, the relative density and viscosity of the mud can be adjusted, the pump volume should be increased appropriately and an appropriate amount of sand and gravel can be put into the hole to solve the problem of mud bags and smudged drills. Use scrapers with small teeth and A drill cone with a large slurry outlet; if the drill is seriously stuck, the drill should be stopped and the drilling slag should be removed. Check and calculate the inner diameter of the drill pipe, the dimensions of the drilling slag inlet and outlet, and the slag discharge equipment.
Expansion and shrinkage:
Hole enlargement is more common, and generally, the hole diameter is too large. When the groundwater is in motion, the soil is loose, or the drill cone swings too much, hole expansion is prone to occur. The reasons for hole expansion are the same as hole collapse. It can range from hole expansion to hole collapse in severe cases. If only a part of the hole collapses and the hole is expanded, the drilled hole can still reach the designed depth and no treatment is needed, but the amount of concrete poured will be greatly increased. If drilling continues to be affected by collapse after hole expansion, it should be treated as a hole collapse accident.
Shrinkage holes are abnormal reductions in hole diameter, which generally manifest as signs of the drill getting stuck during drilling, being unable to lift the drill bit, or making noise when drilling. There are two reasons for shrinkage cavities: one is that the drill cone is not repaired in time, and the severely worn drill cone often drills holes that are slightly smaller than the designed pile diameter; the other is due to the presence of soft plastic soil (commonly known as rubber soil) in the ground. , which causes the pore size to shrink when exposed to water. Shrinkage cavities can occur with various drilling methods. To prevent shrinkage holes, the former must promptly repair worn drill bits, and the latter must use high-quality mud with a small water loss rate to protect the wall and must rotate quickly and advance slowly, and drill twice or three times, or use a winch to hoist the drill cone up and down, left and right, repeatedly. Scan the hole to enlarge the hole diameter until the shrinkage cavity reaches the design requirements. For holes with shrinkage cavities, the steel cage must be poured immediately after it is in place to prevent the pile body from shrinking or exposing the steel bars.
Broken outer rod:
Commonly found on rotary drills.
Cause of the accident:
① Use drill pipes drilled with small-diameter holes in hydrogeology or geological drilling to make large-diameter bored piles for bridges. Their strength and stiffness are too small and they are easy to break.
② The improper rotation speed selected during drilling will increase the torsion or bending stress on the drill pipe and cause it to break.
③ The drill pipe has been used for too long, and the joints are damaged or the joints are excessively worn.
④ The geology is hard and the drilling footage is too fast, which overloads the drill pipe.
⑤ Foreign matter appears in the hole, and the resistance suddenly increases without stopping drilling in time.
Prevention and treatment:
① Do not use severely bent drill pipes. It is required that the connection of each drill pipe section and the thread connecting the drill pipe and the drill bit are intact. The drill pipe joints connected by screw sleeves must have locking facilities to prevent reverse rotation and loosening.
② The footage speed should be controlled during drilling. When encountering hard and complex geology, you should operate carefully and carefully.
③ During the drilling process, always check the wear of each part of the drilling tool and whether the joint strength is sufficient. If it does not meet the requirements, replace it in time.
④ If foreign objects are encountered during drilling, they must be dealt with before drilling.
⑤ If a drill pipe breakage accident occurs, the fallen drill pipe can be salvaged according to the aforementioned salvage method. Check the cause, replace it with a new or larger drill pipe, and continue drilling.
Hole leakage:
Cause of the accident:
① When drilling in highly permeable gravel or quicksand, especially in formations with underground water flow, the slurry will leak out of the hole wall.
② The casing is buried too shallowly and the backfill soil is not compacted enough, resulting in slurry leakage from the blade foot.
③ The casing is poorly made and the joints are not tight, causing slurry leakage.
④ The water head is too high and the water column pressure is too high, causing slurry to seep into the hole wall.
Approach:
① Rotary drilling rigs that fall into the first situation should use relatively viscous or high-quality mud for drilling. The percussion drill can thicken mud or backfill clay mixed with flakes and pebbles to repeatedly impact and strengthen the wall protection.
② If the casing is leaking slurry, it should be handled by the aforementioned regulations on the production and burial of the casing. If the leakage of slurry at the joint is not serious, the diver can plug it with cotton or batting to seal the joint. If the water leakage is serious, the casing should be dug out, repaired, and re-buried.
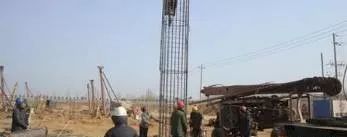
Reinforcement cage installation quality issues:
① The installation of the steel cage does not match the design elevation
Preventive measures: After the steel cage is made, pay attention to prevent it from twisting and deforming. The entrance holes of the steel cage should be kept vertical when installing. The distance between the concrete protective layer pads should not be too large. The length of the hanging bars should be accurately calculated and checked repeatedly during installation.
② Floating of a steel cage
Preventive measures for steel cage floating: Strictly control the quality of concrete, control the slump at 18±3cm, and have good workability of concrete. After the concrete enters the steel cage, the concrete should not rise too fast. The buried depth of the conduit in the concrete should not be too large. It should be strictly controlled below 10m. When lifting the conduit, it should not be too fast to prevent it from falling.
Hook the conduit to the steel cage and bring it up.
Underwater concrete pouring problems:
① Blocked pipe
Preventive measures: Commercial concrete must be supplied by manufacturers with qualifications and reputable quality assurance. The grading and mixing of concrete must ensure that the workability, water-cement ratio, slump, and initial setting time of the concrete meet the design or specification requirements. On-site Randomly checks that the slump of each load of concrete must be controlled within the allowable range of bored pile construction specifications. The conduit used for perfusion should be straight and the inner wall should be smooth and leak-proof.
② The top of the pile is loose
Preventive measures: First, ensure a certain height and length at the top of the pile. Due to the influence of sediment and thick mud, it is easy to produce false measurements. Therefore, a detection box with a steel pipe can be used. Only when the sample picked up in the sampling box is concrete instead of sediment can it be confirmed that the final filling elevation has been reached.
③ The concrete of the pile body is filled with mud or the pile is broken
Preventive measures: Strictly control the mud density and sedimentation at the bottom of the hole when forming the hole. The mud must be completely removed during the first hole cleaning. The conduit should be raised slowly during the concrete pouring process. Especially when reaching the top of the pile, it is strictly prohibited to lift the conduit significantly. Strictly control the buried depth of the conduit. When pouring concrete for a single pile, it is strictly forbidden to interrupt the material midway. When pulling out the conduit, accurate calculations must be made to control the buried depth of the concrete after the conduit is pulled out. It is strictly prohibited to pull out the pipe based on experience.
Hole inspection and hole cleaning in concrete cast-in-place piles
First, use corresponding instruments and equipment to detect the hole depth, hole diameter, hole position, and hole slope to make it comply with the provisions of the construction design drawings. After strict inspection procedures, the steel cage can be placed and concrete can be poured;
Second, the deviation between the cast-in-place pile drilling and the design must be within the specified range [see Table 1 for details];
Third, if defects or abnormalities in hole formation are found, reasonable remedial measures need to be taken immediately;
Fourth, after inspecting the hole, it is necessary to clean the hole according to the actual conditions of the hole. During the process of cleaning the hole, keep the water level in the hole 1.5 to 2.0m higher than the groundwater level outside the hole, and the sediment thickness should not be higher than 5cm. ;
Fifth, after carrying out strict hole inspection and hole cleaning procedures, fill in the final hole inspection sheet in detail and then implement the subsequent concrete pouring work.
Cutting off the Pile Heads of Concrete Bored Piles and Removing the Concrete
After the construction of concrete bored piles is completed, the static load test method needs to be used to test the bearing capacity of the single pile, and the small strain test method is used to test the quality of the pile body. The number of test piles tested using the static load test method exceeds 1 of the total number of piles. %, the number of test piles shall not be less than 3, the number of test piles tested by the dynamic load test method shall account for more than 15% of the total number of piles, and the number of test piles shall not be less than 15. For piles that take core samples for testing, the diameter of the drilled core sample should be within the range of 70 to 110 mm, and the core sample must be at least 50 cm above the bottom of the pile. After the core sample testing test is completed, a high-pressure injection of pure cement slurry is used to fill the pile body. If the quality test results show that the quality of the pile body is unqualified, at least 1 to 2 additional piles need to be added for replacement, and the size, location, and bearing capacity of the new pile body need to be redesigned, and then drilling construction processing is carried out. In addition, in today’s foundation pile inspection, the ultrasonic cross-hole transmission method to detect foundation pile integrity has become a representative method of non-destructive testing, which has the characteristics of convenient detection, high accuracy, and clear positioning. This method is to embed several acoustic detection pipes parallel to the longitudinal axis of the pile in the pile. During the detection, the acoustic detection pipes are filled with clean water as a coupling agent, and then an ultrasonic transducer is placed. One emits a high-frequency elastic pulse wave, and passes through The concrete of the pile body is received by another transducer converted into an electrical signal, and transmitted to the terminal. The parameters of the received ultrasonic pulse, such as the change of sound speed C, frequency F, amplitude A, and the waveform, are used to analyze the continuity and faults of the concrete of the pile body. , sand inclusions, mud inclusions, honeycombs, and other defects, and the size and location of defects. When performing ultrasonic testing, you should pay attention to four key points to eliminate the impact of such factors on the test results:
First, the acoustic tube must be kept clean and free of blockage, otherwise, it must be flushed and cleaned to ensure the uniformity of the clean water coupling agent to avoid weakening the received pulse signal;
Second, the transducer that receives the pulse must be highly consistent and its position must not be inconsistent up and down;
Third, during the installation of the acoustic pipe and the pouring of concrete, the acoustic pipe must be protected to prevent the pipe from tilting;
Fourth, the detection rate must be properly controlled, especially at the bottom and top of the pile, which have a greater impact on the integrity of the pile body, and must be detected. Generally speaking, the detection frequency should be 100%
Thanks!
