
Scope of Application
1. Scope of application of hammered prestressed pipe piles
Hammered prestressed pipe piles are suitable for all kinds of cohesive soils and silt soils. When it is necessary to penetrate the interlayer of thick sandy soil or the hard interlayer containing more gravel and pebbles, the effect of hammered pipe piles is better, but due to the noise, its use should be restricted in urban construction.
2. Application scope of static pressure prestressed pipe piles
Static pressure prestressed pipe piles are suitable for soft soil, fill soil, general clay soil, and silt soil. They are especially suitable for pile driving in areas with dense residents, dangerous buildings, and nearby areas with strict environmental requirements. The bearing layer is suitable for hard plastic or hard clay. layer, medium-density or dense crushed soil layer, sandy soil, fully weathered rock layer, strongly weathered layer; but it is not suitable for use in underground boulders, obstacles, or medium-density or above sand interlayers with a thickness greater than 2m.
Construction Technology
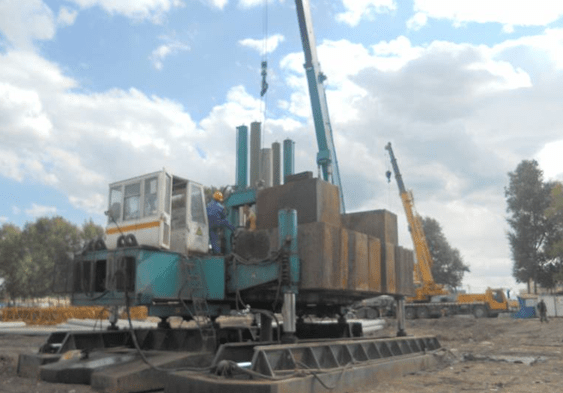
1, Hammering prestressed pipe pile construction technology
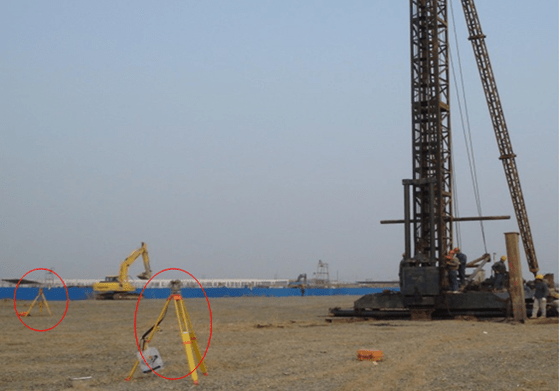
1.1 Setting out the stakes
(1) Prepare the pile measurement and positioning map according to the design drawings, and ensure that the axis control points are not affected by vibration and soil squeeze during pile driving.
(2) According to the actual piling route map, the measurement and positioning control network is divided according to the construction area. Generally, 10-20 pile positions are staked out in an area according to the daily construction progress, and a φ6.5 long 30-meter long pile is driven into the ground at the center point of the pile position. -40cm steel bars marked with red paint.
(3) After the pile driver is moved, a second review should be carried out to ensure that the pile position deviation is less than 10mm.
(4) Before pile construction, length marks in meters should be drawn on the matching engineering piles according to the length of the construction piles, and the lengths of the piles should be marked from bottom to top to observe the depth of the piles entering the soil and record the settlement per meter. The number of hammer blows on the pile.
1.2 Pile driver in place
When the pile driver is in place, the pile position should be aligned to ensure vertical stability and no tilt or movement during construction.
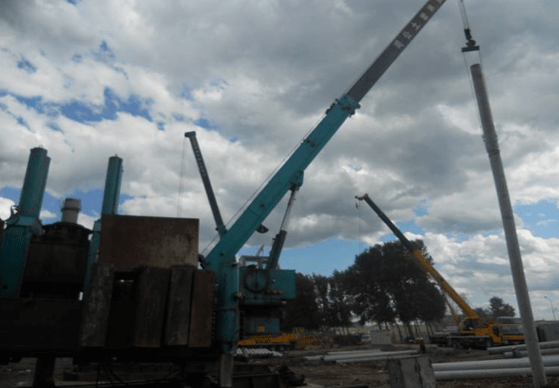
1.3 Lifting prefabricated pipe piles
First, tie the wire rope and rigging used for lifting the pile. When lifting the pipe pile during construction, you can use the one-point method (the position is 0.29L away from the pile head). Start the crane to lift the pile, so that the pile tip is vertically aligned with the center of the pile position, and slowly Put it down and insert it into the soil, and the position must be accurate; after checking the top of the pile and buckling the pile cap or pile hoop, you can remove the rigging.
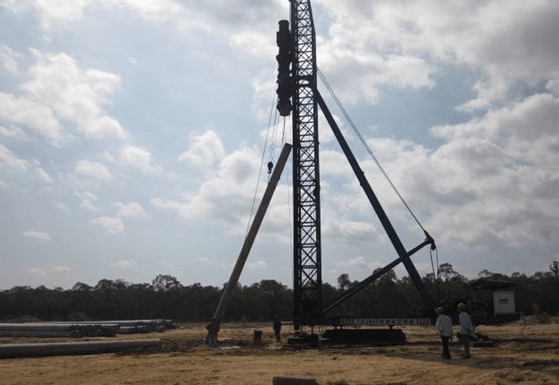

1.4 Stable piles
After inserting the pile tip into the pile position, first use the pile hammer’s weight to insert the pile into the ground 30-50cm, and then stabilize the pile vertically. Short piles within 10m can be visually inspected or calibrated in two directions with a line drop; piles above 10m or driven piles must be calibrated in two directions with a line drop or a theodolite, and visual inspection is not allowed. The verticality deviation shall not exceed 0.5% when the pile is inserted. Before the pile is driven, a ruler should be set on the side of the pile or on the pile frame to facilitate observation and recording during construction.
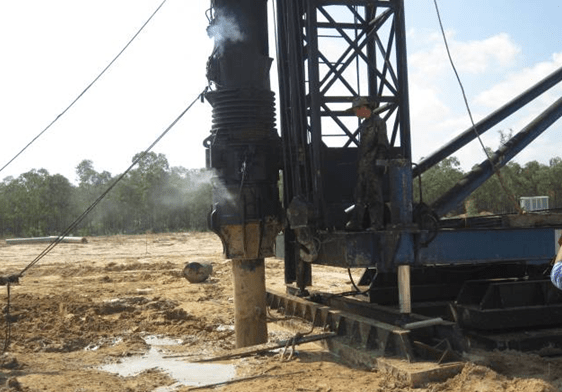
1.5 Piling
(1) Piling should be driven with a heavy hammer and a low blow. The hammer weight should be selected based on the engineering geological conditions, pile type, structure, density, and construction conditions.
(2) The order of piling is generally based on the principles of deep first then shallow, long piles first then short piles, large diameter small diameter, large cap piles first, and then small cap piles. Due to the different densities of piles, the piles can be piled from the middle Advance symmetrically in two directions, or proceed from the middle to the surroundings; when one side is adjacent to a building, strike from the adjacent building to the other direction.
(3) The surface of pipe piles should be marked with lines every meter to facilitate piling records. The piling records should include construction parameters such as soil penetration depth, pile feeding depth, pile top elevation, final penetration, and pile hammer drop distance.
(4) When encountering drastic changes in penetration, sudden tilt, displacement or severe rebound of the pile body, serious cracks or breakage on the top or body of the pile, etc., pile driving should be suspended, the reasons should be analyzed, and corresponding measures should be taken.
(5) The total number of hammer blows for each pile and the number of hammer blows for the last 1m of pile sinking can be controlled according to the following regulations:
①The total number of hammer blows for PC piles should not exceed 2,000, and the number of hammer blows for the last 1m of pile sinking should not exceed 250;
②The total number of hammer blows for PHC piles should not exceed 2,500, and the number of hammer blows for the last 1m of pile sinking should not exceed 300.
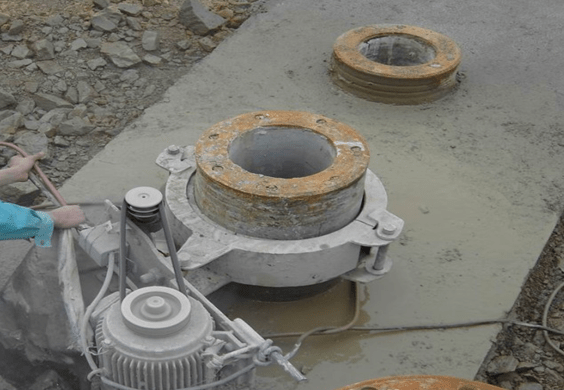
(6) When the bearing layer at the pile end is a weathered rock (soil) layer that is easily softened by water, the back-sealing concrete construction of the inner hole of the pipe pile should be carried out according to the design requirements during the piling construction process. The back seal concrete construction should comply with the following regulations:
① The pile tip should be a sealed type, and when welding the pile tip, the weld should be continuous and full without water seepage;
② After the first section of the pipe pile is driven into the soil (rock) layer, it is advisable to manually pour C30 fine stone concrete with a height of 1.5-2.0m into the bottom of the inner hole of the pipe pile immediately, or after the hammer is closed, it should be inspected by light or in-hole photography. After the inner wall of the pipe pile is intact, the backing concrete is poured immediately.

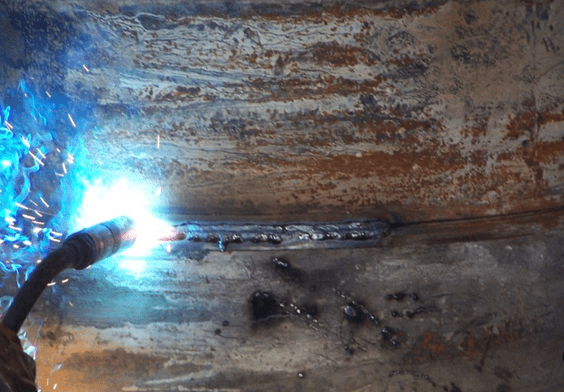
1.6 Connecting piles
(l) When the pile length is not enough, the piles should be connected. Before connecting the piles, use a wire brush to remove dirt and rust on the joint surface, and the upper and lower sections should be welded firmly. Generally, electric welding piles are used. Welding should be carried out symmetrically around the pile. After the upper and lower pile sections are fixed, remove the guide hoop and then weld in layers. The number of welding layers should not be less than 2. The welding slag must be cleaned after the first layer is welded. The second layer (of) welding can be carried out only after it is clean. The weld should be continuous and full; the welded pile joint should be naturally cooled before hammering can continue. The natural cooling time should not be less than 8 minutes; it is strictly prohibited to use water cooling or welding. When it’s good, give it a beating.
(2) When connecting piles, it is generally carried out when it is about 0.5 lm from the ground; guide hoops should be installed at the pile heads of the lower piles; when connecting piles, the upper and lower pile sections should be kept straight, and the misalignment deviation should not be greater than 2mm; when connecting piles When correcting deviations in place, sled hammers shall not be used to strike laterally; the node bending height shall not be greater than l‰ pile length.
(3) When welding on rainy days, reliable rainproof measures should be taken; when welding at low temperatures in winter, enclosure and insulation heating measures should be taken.
1.7 Send piles
(1) After the pile length is connected according to the design and driven normally, whether to send piles should be controlled based on various indicators determined during the design and test pile driving. The depth of pile sending should not be greater than 2.0m. When the depth of pile delivery exceeds 2.0m and is not greater than 6.0m, the pile driver should be a three-point support crawler self-propelled or walking diesel pile driver; vertical grain hardwood or circular laminated steel wire rope should be used between the pile cap and pile hammer. Hammer Pad”, its thickness should be 150-200mm.
(2) Before sending piles, it should be ensured that the guide feet of the pile hammer do not extend out of the end of the guide rod. The height of the pipe pile above the ground should be controlled at 0.3-0.5m; when the top of the pile is driven close to the ground and the pile needs to be sent, the pile should be measured. Check the verticality of the pile top and check the quality of the pile top. Once qualified, the pile should be delivered in time.
(3) A special pile feeder should be used to drive piles. The pile feeder should be made into a cylindrical shape and should have sufficient strength, stiffness, and driving resistance; the length of the pile feeder should meet the requirements of the pile feeding depth and the curvature Must not be greater than 1/1000.
(4) The upper and lower end faces of the pile feeder should be flat and perpendicular to the central axis of the pile feeder; the lower end face of the pile feeder should have holes to connect the inner cavity of the hollow pile to the outside world.
(5) The pile feeder should match the pile. The depth of the sleeve at the lower end of the sleeve-type pile feeder should be 250-350mm, and the inner diameter of the casing should be 20-30mm larger than the outer diameter of the pile.
(6) During the pile feeding operation, 1-2 layers of sacks or cardboard should be placed between the pile feeding device and the pile head. The thickness of the inner elastic liner after compaction should not be less than 60mm.
(7) The pile tip should enter the bearing layer according to the design requirements. The final penetration of the pile when the pile is not fed should be referred to and corrected under the same conditions; the empty hole should be backfilled or covered in time after the pile feeding is completed.
1.8 Termination of hammering
The control of pile termination hammering should comply with the following regulations: when the pile end is located in the general soil layer, the design elevation of the pile end should be controlled mainly, with penetration as a supplement; the pile end should reach hard, hard plastic clay soil, medium density or above When it comes to silt, sandy soil, gravel soil, and weathered rock, the penetration control should be the main one, supplemented by the pile end elevation. When the penetration has reached the design requirements but the pile end elevation has not been reached, hammering should continue 3 arrays, and confirm that the penetration of 10 shots per array should not be greater than the value specified in the design. If necessary, the construction control penetration should be determined through testing; after meeting the design requirements, fill in the construction records. If it is found that the pile position is significantly different from the requirements, it should be studied and dealt with in conjunction with the relevant units.
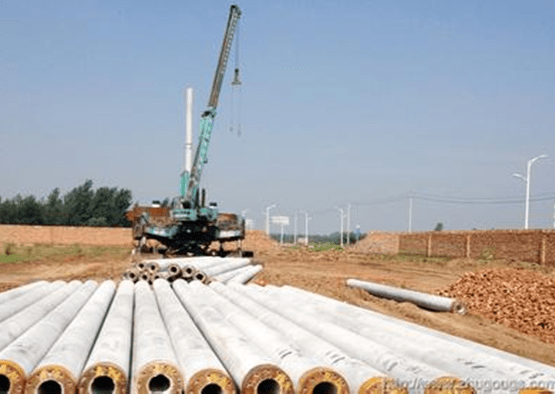
Construction Technology of Static Pressure Prestressed Pipe Piles
2.1 Setting out the stakes
Same as “setting out the pile position” in “hammering prestressed pipe piles”.
2.2 Pile driver in place
When the pile driver is in place, the pile position should be aligned, and the static pressure pile driver should be adjusted to be level and stable to ensure that it does not tilt or move during construction.
2.3 Lifting piles in place
(1) First tie up the wire ropes and rigging used to lift the piles. When lifting the pipe piles during construction, you can use the one-point method (positioned 0.29L away from the pile head). Start the crane to lift the piles and lift the prefabricated piles to the static pressure pile machine. In the clamp, align the pile tip vertically with the center of the pile position, clamp and place it into the soil, move the static pressure pile driver to adjust the verticality of the pile, and adjust the static pressure pile driver to the level and stability after meeting the requirements.
(2) When the pile tip is inserted into the pile position, the verticality deviation shall not exceed 0.5%. Before pressing the pile, a ruler should be set on the side of the pile or on the pile frame to facilitate observation and recording during construction.
2.4 Pile pressing
(1) Pile pressing: Start the pile pressing cylinder, slowly press down the pile, and control the pressure application progress to meet the requirements of the relevant design specifications. After reaching the requirements of the pile pressing force, the load must be maintained stably. If it cannot be stabilized, the load must be held again until the load is stable. The load holding time shall be determined by the designer and supervisor during the on-site pile test.
(2) Pile pressing should be continuous. Each pile should be pressed to the bottom continuously at one time, and the effective pile length of the last section should not be less than 5m.
(3) When the building area is large and the number of piles is large, the pile foundation can be divided into several sections, and pile pressing can be carried out separately within each section. The sequence of pile pressing is generally first deep and then shallow, long piles first and then short piles, large diameter first then small diameter, and the principle of constructing large cap piles first and then small cap piles. Due to the different densities of piles, they can be divided into two directions from the middle. Advance symmetrically, or from the center to all sides. When one side is adjacent to a building, pressure is applied from the adjacent building to the other direction. When the site stratum locally contains sand, gravel, or pebbles, piles should be pressed in the area first.
(4) The verticality of the pile body should be measured during pile pressing. Section 1 The verticality deviation should not be greater than 0.5% when the pile is pressed down; when the verticality deviation of the pile body is greater than the specification requirements, the cause should be found and corrected; when the pile tip enters the harder soil layer, it is strictly forbidden to move the frame Wait for methods to force correction.
(5) When one of the following situations occurs, pile driving operations should be suspended, the reasons should be analyzed, and corresponding measures should be taken:
① The pressure gauge reading is inconsistent with the soil properties in the survey report;
② It is difficult for piles to penetrate the hard interlayer with a weak underlying layer;
③ The actual pile length is quite different from the designed pile length;
④ Abnormal noise occurs; the working status of the pile pressing machinery is abnormal;
⑤ Abnormal phenomena such as longitudinal cracks in the pile body and spalling of concrete at the pile head;
⑥ The clamping mechanism is slipping;
⑦ The pile driver sinks;
⑧ The effective pile length is less than 6m;
⑨ The pile body suddenly tilts or moves;
⑩ The adjacent pile floats or the pile head deviates;
⑪ The ground is uplifted, and nearby houses and municipal facilities are cracked and damaged.
2.5 Connecting piles
Same as “pile connection” in “hammering prestressed pipe piles”.

2.6 Send piles
(1) Measure the verticality of the pile and check the quality of the pile head. Only when the pile is qualified can the pile be sent. The pressing and sending operations should be carried out continuously.
(2) A special steel pile feeder should be used to feed piles and engineering piles should not be used as pile feeders.
(3) When most piles on the site are short (L ≤ 16m) or the bearing layer at the pile end is a weathered rock that is easily softened, the pile feeding depth should not exceed 1.0m.
(4) In addition to the provisions of the previous paragraph, the depth of pile delivery may exceed 2m as needed, but should not exceed 6m.
(5) The maximum pile pressing force when sending piles should not exceed 1.1 times the allowable pile pressing force for the pile body holding pressure.
2.7 Final pressure conditions
Final pressure conditions should meet the following requirements:
(1) The final pressure standard should be determined based on the test results of on-site pressure test piles.
(2) The number of consecutive re-pressures for final pressure should be determined based on factors such as pile length and geological conditions. For piles with a depth of 8m or more, the number of repressurizations can be 2-3 times; for piles with a depth of less than 8m, the number of repressurizations can be 3-5 times.
(3) The stable pile pressing force shall not be less than the final pressure, and the stable pile pressing time should be 5-10 seconds.
When the pile pressure has reached the final pressure condition, load holding and re-pressure should be carried out immediately, and construction records should be filled in, especially the re-pressure penetration and pile top elevation during the last three times of stable pressure.
2.8 When a pile is pressed, the pile section exposed above the ground must be cut off before moving the machine. Pipe piles should be cut with a pile saw. Square piles should be cut with a manual chisel. It is strictly forbidden to use the thrust of the pile driver to forcefully break the pile or use a conical object to press into the inner hole at the top of the pipe pile to break the pile head. After the pile head is cut off, a level or other instruments should be used to measure the pile top elevation. After all the engineering piles are pressurized, the pile top elevation should be measured again.
Quality Control Points
1. The concrete strength grade of PC piles shall not be lower than C50, and the concrete strength grade of PHC piles shall not be lower than C80. The strength of prestressed pipe piles shall reach 100% of the design strength before piling can be started.
2. Compare the geological data and reasonably select construction tools according to the design requirements. For hammering piles, use the principle of heavy hammer and low blow. Select a pile hammer and control the total number of hammer blows to avoid fatigue damage to the concrete of the pile body, fracture of the pile body, and static pressure piles. During construction, the pressure should not exceed the strength that the pile body can withstand. The pile-pressing process of the same pile should be carried out continuously. When pressing the pile, the operator should always pay attention to the pressure value on the pressure gauge and arrange a reasonable pile pressing sequence before pressing the pile.
3. The construction site should be flat. When static pressure pile driving is used, the bearing capacity of the site foundation should not be less than 1.2 times the ground pressure of the pile driver. Otherwise, corresponding foundation treatment measures should be taken. Before piling, the construction equipment should be carefully checked and the guide rails should be adjusted. straight.
4. Reasonably arrange the piling route according to the construction plan to avoid pile pressing or pile squeezing.
5. Pipe piles should be stacked correctly during transportation and stacking. Pipe piles should be stacked in a single layer. When the site does not allow stacking, they should comply with relevant specifications. When piles are stacked, they should be stacked perpendicular to the length of the pile. Set two pads on the ground in the direction. The pads should be located 0.2 times the length of the pile from the pile end. The outermost piles on the bottom floor should be tightly plugged with wooden wedges at the pads. The pads should be long pressure-resistant wooden canopies. Or sleepers and angular metal components are not allowed; when piles are stacked in more than 2 layers, a crane should be used to pick up the piles, and it is strictly forbidden to drag the piles; when hoisting piles, they should be lifted gently to avoid breaking the pile body before use.
6. Quality inspection of pile tip and pile body
First of all, the pile tips must be inspected and measured. According to the structural requirements and design drawing requirements of the pile tips in the relevant specifications for pipe piles, all pile tips on site must be measured. All pipe piles on site must be carefully inspected and the pipe piles measured. The outer diameter, wall thickness, pile body, length, pile curvature, and other relevant dimensions should be recorded in detail. Especially the pipe wall thickness, due to the large clamping force in the static pressure method construction, the pile is easily crushed if the wall thickness is not enough. At the same time, the appearance quality of the pile body should be carefully inspected to check whether the pile body is pockmarked, whether the reinforcement is exposed on the inner and outer surfaces, whether there are cracks on the surface, whether the ends are broken off, whether the pile ferrules are dented, whether the surface concrete has collapsed, etc.
7. The pile position setting out should be reviewed twice using different methods.
8. When driving piles, ensure the verticality of the pile body to avoid tilting of the pile body; ensure that the center line of the pile hammer, pile cap, and pile body coincides with each other to prevent the pile top from being broken and the pile body from being broken due to eccentric stress during piling.
9. When the distance between piles is less than 3.5 days, jump driving should be used. The number of piles driven every day should be controlled. There should not be more than 12 piles in the same area to avoid floating and tilting of the pile body.
10. When driving the bottom pile, hammer weight or cold hammer construction should be used to drive the bottom pile slowly, straighten the verticality of the pile body, and clean up any underground obstacles in time before re-construction.
11. When connecting piles, the welding should be continuous and full, and the welding slag should be removed. The natural cooling time of the welding should be no less than 8 minutes. If the groundwater level is high, the cooling time should be appropriately extended to prevent the welding seam from being brittle when exposed to water and quenched.
12. Make the pile cap and pile feeder as required according to the size of the pipe pile to prevent the pile top from being broken and the pile body from breaking due to substandard sizes of the pile cap and pile feeder.
13. Professional cutting machines should be used to cut pipe piles. It is strictly prohibited to use a sledgehammer to hit the piles laterally or forcefully pull the piles.
14. Try to avoid pile drivers, cranes, and other large machinery from walking on driven engineering piles.
Common Quality Problems and Solutions
The construction of prestressed pipe piles is a project that is immediately dug and concealed. Problems cannot be rectified after the construction is completed, and can only be remedied by measures such as adding piles. Therefore, the quality must be strictly controlled during the construction process, and every step must be by Standards that are strictly enforced.
1. Pile body tilt
1.1 Causes
(1) The verticality was not checked in both directions as required before the injection.
(2) Encounter underground obstacles.
(3) The site is uneven and the pile driver chassis is not stable and level.
1.2 Prevention and control measures
(1) Before driving, a theodolite or line drop should be set up in both directions in the square of the pile driver and on the side of the vertical pipe pile as required. The hammer can only be lifted after the verticality meets the requirements (less than 0.5%L), and the hammer can be driven in about 1m before use. The instrument checks the center position and verticality of the primary pile and can be driven normally only after confirmation.
(2) If the underground obstacles are shallow, the piles can be pulled out first. After the obstacles are removed, the pits are filled up and piles are placed again. If the obstacles are deep and cannot be dealt with, the supervision, design institute, etc. can be consulted. The unit discussed a solution and changed the pile location.
(3) The site should be flat and solid, generally not larger than 9°, to meet the driving conditions of the pile driver. Sleepers should be placed under the pile driver to keep the chassis of the pile driver stable and level.
2. The weld is not full and the pile connection is cracked.
2.1 Causes:
The welding operation was not carried out by the regulations and the welding was not carried out in layers.
2.2 Prevention and control measures
(1) Before connecting piles, impurities, oil, moisture, etc. on the connecting parts must be cleaned to ensure that the connecting parts are clean.
(2) When connecting piles, the two pile sections should be on the same axis, the welded embedded parts should be flat, and the number of welding layers should not be less than 2. During welding, the inner layer of welding slag must be cleaned before welding the outer layer. The electric welding of the groove must be full, and the thickness of the electric welding should be 1mm higher than the groove.
3. Dramatic changes in penetration
3.1 Causes
(1) The geological conditions are unknown, and there are cavities, caves, interlayers, ancient tombs, etc. underground.
(2) The underground force-bearing rock formations are highly undulating.
(3) The pile body is broken and broken.
3.2 Prevention and control measures
(1) During the drilling process, if the penetration suddenly increases, the construction should be stopped immediately. Methods such as advance drilling can be used to first ascertain the geological conditions at the pile location, and first use medium sand to cover cavities, caves, etc. The piles should be piled again after the piles are filled with clay or clay, or other forms of foundation treatment methods should be used.
(2) When the hammer is about to be retracted if the penetration suddenly increases, it is generally caused by the pile body breaking or the pile body itself being broken due to the large fluctuations in the underground force-bearing rock layer. In this case, use a chandelier and hanging weights from the inner hole of the pile body to check the integrity of the pile body to see what the cause is.
① If it is caused by large geological fluctuations, special pile tips need to be used, and pile tips with strong rock embeddedness should be used for construction;
② If it is caused by the pile body itself being broken, the quality of the pipe piles entering the site needs to be inspected and pipe piles with qualified quality must be purchased; the pipe pile body strength must reach 100% before it can be used; at the same time, during the driving process, To control the total number of hammer blows, the total number of hammer blows for PC piles should not exceed 2,000, and the number of hammer blows for the last 1m should not exceed 250; the total number of hammer blows for PHC piles should not exceed 2,500, and the number of hammer blows for the last 1m should not exceed 300.
4. The ground is bulging, and adjacent piles are floating or displaced too much.
4.1 Causes
(1) The pile foundation is dense, the soil is saturated and dense, and the spacing between piles is small. When sinking piles, the soil is squeezed to the ultimate density and bulges upward, causing adjacent piles to float.
(2) When constructing dense pile groups on a soft soil foundation, the pore water pressure caused by pile sinking will push adjacent piles to one side or float.
4.2 Prevention and control measures
(1) Use the “pile planting method” (drill holes first, drill through the hard interlayer, insert piles into the holes, and drive them to the design requirements) to reduce soil compaction and the increase in pore water pressure.
(2) Use open pile tips to allow part of the soil to enter the pile cavity to reduce soil compaction; at the same time, use the “jump driving method” construction to control the number of piles driven every day, and it should not exceed 12 piles in the same area.
(3) Use precipitation or drainage measures such as well-point precipitation, sand wells, or blind trenches.
(4) Foundation pits must not be excavated at the same time during pile sinking. Excavation can only be carried out after an appropriate period after the pile sinks. The interval should depend on the specific geological conditions, the depth and area of foundation pit excavation, the density of piles, and the dissipation of pore water pressure. Depending on the situation, it should generally take about two weeks.
5. The pile body is broken
During the sinking process of the pile, the pile body suddenly tilted and dislocated. There was no special change in the soil conditions at the pile tip, but the penetration suddenly increased.
5.1 Causes
(1) When making piles, the bending of the pile body exceeds the regulations, the pile tip deviates greatly from the longitudinal axis of the pile, and the pile body tilts or bends during the sinking process.
(2) After the pile is driven into the soil, it encounters a large hard obstacle and pushes the pile tip to one side.
(3) If the stable pile is not vertical, drive it into the ground to a certain depth and then use the racking method to correct it so that the pile body bends.
(4) When constructing piles with more than two sections, the two connected pile sections are not on the same axis, resulting in twists and turns.
(5) The concrete used to make the piles is not strong enough, and cracks or fractures in the piles are not discovered during stacking and lifting.
5.2 Prevention and control measures
(1) Before construction, the obstacles under the pile positions should be cleared, and if necessary, drill to understand each pile position. The pile components must be inspected and if it is found that the bending of the pile body exceeds the specified limit (L/1000) or the pile tip is not on the longitudinal axis of the pile, it should not be used.
(2) If the pile is found to be not vertical during the pile stabilization process, it should be corrected in time. When the pile is pressed into a certain depth and becomes seriously tilted, it is not appropriate to use the rack-moving method to correct it. When connecting piles, ensure that the upper and lower pile sections are on the same axis, and the joints should be strictly to the operating requirements.
(3) During the stacking and lifting of piles, relevant regulations should be strictly followed. Piles that are found to be cracked beyond the relevant acceptance regulations shall not be used.
6. The top of the pile is cornered or broken.
6.1 Causes
(1) The proportion of precast concrete is poor, the construction control is not strict, the vibration is not dense the curing time is short, and the curing measures are insufficient.
(2) The pile top surface is uneven, the pile top plane is not perpendicular to the pile axis, and the pile top protective layer is too thick.
(3) The contact surface between the pile top and the pile cap is uneven, and the pile is not vertical when sinking, causing the top surface of the pile to tilt, causing the top surface of the pile to lose its angle due to concentrated stress.
(4) During pile sinking, the pile top lining was damaged and was not replaced in time.
(5) The pile hammer is too large and the beat is too high.
6.2 Prevention and control measures
(1) When making piles, they must be vibrated and compacted, and the dense stirrups on the top of the piles must be accurately positioned; after the piles are formed, they must be strictly maintained.
(2) Before sinking the pile, the pile components should be inspected to see whether there are concavities and convexities on the top of the pile, whether the top surface of the pile is perpendicular to the axis, and whether the pile tip is deflected. Piles that do not meet the requirements of the specification should not be used or have been repaired. can be used later.
(3) Check whether the contact surface between the pile cap and the pile is flat. If it is not flat, padding should be added before construction can be carried out.
(4) When sinking piles, the stable piles must be vertical and there must be a liner on the top of the pile. If the liner fails or does not meet the requirements, it must be replaced.
(5) During construction, the pile hammer should be reasonably selected based on the geological conditions, pile cross-section size, and shape. The “heavy hammer and low blow” method is adopted to strictly control the jumping height of the pile hammer, and it is prohibited to raise or lower the pile hammer.
7. Pile sinking fails to meet requirements
The final control of pipe pile construction is based on the final penetration and final pile length. Generally, the final penetration is the main control, combined with the final pile length control parameters. Sometimes pile sinking cannot meet the final control requirements of the design.
7.1 Causes
(1) There are not enough exploration points or rough exploration data, and the engineering geological conditions are unclear, especially the undulating elevation of the bearing layer, which leads to incorrect consideration of the bearing layer or pile length selection in the design.
(2) The exploration work is based on points and areas, and it is impossible to fully understand the local hard and soft interlayers, especially under complex engineering geological conditions and underground obstacles such as large stones and concrete blocks. When pile-pressing construction encounters this situation, it will fail to meet the construction control standards required by the design.
(3) When the Neomodern sand layer is used as the bearing layer or when it passes through a thicker sand interlayer, due to the instability of its structure, the strength of the same layer of soil varies greatly. When the pile sinks into this layer, it is difficult to enter the bearing layer. Only when the pile is deep can it achieve penetration or easily pass through the sand interlayer. However, during pile group construction, the sand layer will become denser and denser, and eventually it will not sink.
7.2 Prevention and control measures
(1) Exploring the engineering geology in detail, conducting supplementary surveys when necessary, and correctly selecting the bearing layer or elevation.
(2) Reasonably select the construction method and pile pressing sequence according to the engineering geological conditions.
8. Common problems and solutions during the construction of piling first and then digging the foundation pit
8.1 In some projects with basements, due to the small foundation pit, it is not possible to drive the pile machine to construct the pipe pile foundation after excavation. The only method of construction is to drive piles first and then dig the foundation pit.
8.2 During construction, the piles in the pit should be sent to the bottom of the foundation pit using a long pile feeder as much as possible. However, due to unclear geological conditions, some parts are still inevitably higher than the bottom of the foundation pit. For this reason, before excavation, the location of the elevated piles should be marked, and a circumferential excavation method should be adopted during excavation to keep the soil excavation around the elevated piles at basically the same plane position. Do not excavate on one side first so that the soil on both sides of the pile forms a soil wall with a large drop. This can easily lead to excessive soil lateral pressure, causing the pile body to tilt or even break.
8.3 For piles at the upper mouth and wall of the foundation pit, due to the inevitable excessive height difference between the soil on both sides, the piles are easily squeezed and broken. Measures must be taken to prevent this. On the one hand, a foundation pit support method with a large insurance coefficient is adopted to reduce the horizontal displacement of the foundation pit wall; on the other hand, steel wire ropes, steel bars, etc. can be used at the top of the pipe piles to pull them to the rear without being affected by the foundation. Anchor at the position affected by the pit earth to offset part of the lateral pressure of the soil.
Thanks
