
Soil nail support is a new type of retaining structure developed in recent years for soil excavation and slope stabilization. It has been rapidly popularized and applied because it is economical, reliable, and fast and easy to construct.
The so-called “Soil Nails” (derived from the French Clouage de Sol) are slender rods, such as steel bars or steel pipes, placed at a close spacing in the in-situ soil, and are usually wrapped with cement mortar or Cement paste slurry. The characteristic of soil nails is that they are in contact with the surrounding soil along the entire length, work in groups, and form a composite body with the surrounding soil. Under the condition of slight deformation of the soil, the soil nails are passively tensile and deformed through the bonding force or friction on the contact interface with the soil, and the soil nails are mainly restrained, reinforced, or stabilized through tension work.
Technical Principles and Characteristics of Soil Nail Walls
Process Principle: The soil nail wall is a structure composed of slope soil and surface protection reinforced with soil nails. It inserts tie bars into the entire length of the soil to bond with the soil, hangs steel mesh on the slope, and sprays concrete to form a reinforced soil reinforcement section to improve the strength of the entire in-situ soil and limit its displacement, and enhance the stability of the foundation pit slope.
Types of Soil Nail Walls: Drilling and grouting soil nails, driven soil nails, and injection soil nails
Characteristics of Soil Nail Wall Support
- The self-supporting capacity of the soil can be reasonably utilized, and the soil can be used as an integral part of the supporting structure.
- The structure is light, flexible, and has good earthquake resistance and ductility.
- The construction is convenient and safe. The production and drilling of soil nails are simple and easy, and it is flexible and easy to change the design in time according to the deformation data monitored on-site and special circumstances.
- Construction does not require a separate site. This technology shows unique advantages when the construction site is small and large slope protection construction equipment cannot enter the site.
Construction of Soil Nail Wall
Soil nail walls generally consist of three parts: soil nails, surface layer, and drainage system. Detailed construction should meet the following requirements:
- The slope of the soil nail wall should not be greater than 1:0.1.
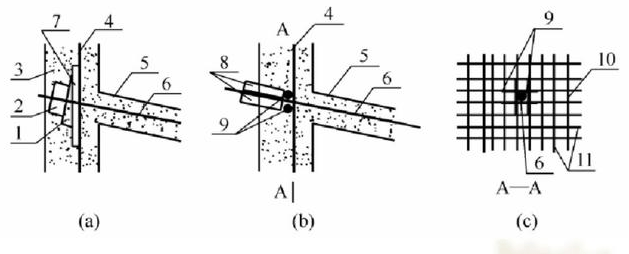
- The soil nails must be effectively connected to the surface layer, and structural measures such as pressure-bearing plates or reinforced steel bars should be provided. The pressure-bearing plates or reinforced steel bars should be bolted to the soil nails or welded to the steel bars.
- The length of soil nails should be 0.5~1.2 times the excavation depth, the spacing should be 1~2m, and the angle with the horizontal plane should be 50~200.
- Soil nailing steel bars should be grade I, IⅡ steel bars, the steel bar diameter should be 16~32mm, and the drilling diameter should be 70~120mm;
- The grouting material should be cement slurry or cement mortar, and its strength grade should not be lower than M10.
- The shotcrete surface layer should be equipped with a steel mesh. The diameter of the steel bars should be 6~10mm, the grid spacing should be 150~300mm, the strength grade of the shotcrete should not be lower than C20, and the thickness of the surface layer should not be less than 80mm.
- The overlap length of the upper and lower sections of the steel mesh on the slope should be greater than 300mm.
- When the groundwater level is higher than the bottom of the foundation pit, precipitation or water interception measures should be taken. The top of the soil nail wall should be protected with mortar or concrete. Drainage measures should be provided at the top and the bottom of the slope. Drainage can be set up on the slope according to specific conditions. hole.
Soil Nail Wall Construction Technology
(1) Foundation Pit Excavation
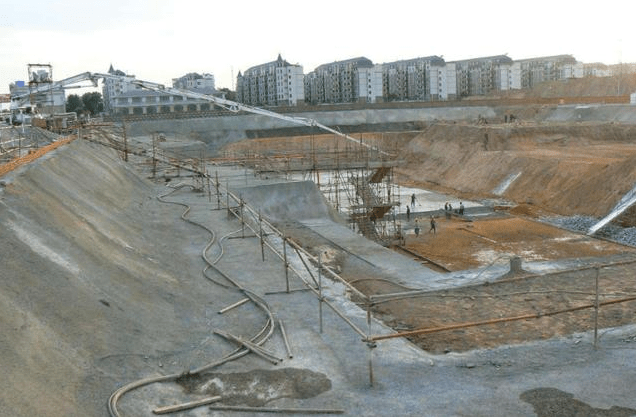
The foundation pit must be excavated strictly in layers and sections according to the design requirements. The next layer of soil shall not be excavated until the upper layer is completed and the full nail spray concrete layer reaches 70% of the design strength. The maximum depth of each layer of excavation depends on the ability of the soil wall to stabilize itself without sliding failure before the support is put to work. In actual projects, the excavation depth of each layer of the foundation pit is often equal to the vertical spacing of the soil nails. The horizontal section width of each layer of excavation also depends on the self-stabilizing ability of the soil wall and is connected with the support construction process. It is generally 10~20m long. When the foundation pit area is large, free excavation in the middle of the foundation pit, 8 to 10 meters away from the surrounding slopes of the foundation pit, is allowed, but care should be taken to coordinate with the excavation of the layered operation area.
Excavation equipment and methods that have little disturbance to the soil on the slope should be used, and over-excavation of the side walls or loosening of the soil on the side walls is strictly prohibited. After the slope is mechanically excavated, small machines or shovels must be used to cut and clear the slope so that the slope and glass surface flatness meet the design requirements.
(2) Spray the First Surface Layer
The surface layer should be prepared as soon as possible after each step of excavation; that is, a thin layer of concrete or mortar should be sprayed on the trimmed side wall immediately. If the geological conditions of the soil layer are good, the road surface layer can be omitted. Shotcrete operations should comply with the following regulations:
The spraying operation should be carried out in sections, and the spraying order within the same section should be from bottom to top, and the thickness should not be less than 40mm.
When spraying concrete, the nozzle and the sprayed surface should be kept vertical, and the distance should be 0.6~1.0m.
After the final setting of the shotcrete for 2 hours, it should be sprayed with water for curing. The curing time should be 3 to 7 hours, depending on the temperature.

(3) Drilling Holes, Installing Soil Nails, Grouting, And Installing Connectors
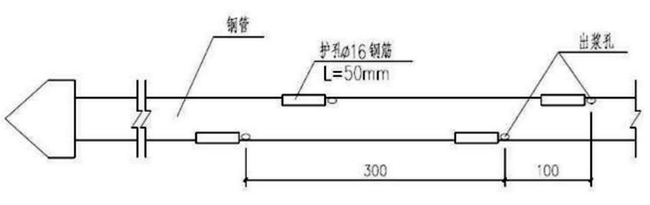
For the setting of soil nails, for steel nails, holes are usually made in the soil first, and then the soil nail steel bars are placed, and grouting is performed along the entire length. For steel pipe nails, the nails can be driven into the soil, and then grouting can be done on the steel pipe
1. Drilling
① Before nailing holes, the hole positions should be determined according to the design requirements and marked and numbered. When obstacles are encountered during the hole-forming process and the hole position needs to be adjusted, the designer should issue a change notice.
② The soil nail hole is drilled using an anchor engineering drill. Water drills are strictly prohibited during the drilling process to prevent the surrounding geological conditions from deteriorating. When opening the hole, drill slowly at the hole position until the footage reaches a certain depth and the soil layer is relatively stable. Before drilling can be accelerated. During the drilling process, the wear of the drill bit should be checked at any time to prevent the hole diameter from not meeting the design requirements.
③ Drilling shall not disturb the surrounding strata. After drilling, use high-pressure air blowing for 2 to 3 minutes to clean the holes. Local water seepage, hole collapse, or falling loose soil in the holes should be dealt with immediately. After the holes are formed, soil-nailing steel bars should be installed and grouted promptly.
2. Insert Soil Nailing Steel Bars
The soil nail reinforcement is made of threaded steel. Before placing it in the hole, a positioning bracket should be set up to ensure that the steel bar is in the center of the drilled hole. The spacing between the brackets along the length of the nail is 2~3m. The structure of the bracket should not hinder the flow of grout during grouting. Free-flowing support material is metal or plastic parts.
Thank you!
